Setup for the workshop#
Most of the materials for this workshop can be found on this website, if you’d like to give input, leave comments or highlight relevant parts (publicly or privately) we encourage you to make use of the hypothes.is plugin via the annotation sidebar on the right side of the page. If you’d rather download these materials, you can do so via the {download} symbol! at the top of the respective page. You can open the respective content (.md files) via an IDE (e.g. VScode, Atom) or via Jupyter Notebooks/Lab.
We’ll come to actual installation instructions shortly, but there are a few other requirements that will need to be satisfied. Please read the whole document and follow the instructions closely.
Required software#
a command-line shell: Bash
Git and Git-Annex
a GitHub Account
a GIN-Account
DataLad
additionally, you’ll generally should have:
An IDE or text editor: e.g. VSCode (recommended)
a modern browser (Install Firefox or Chrome; Safari will also work.)
Docker (a containerization software that enables you to run automated workflows; required for one of our demos) Mac and Linux distributions automatically provide a command line shell, simply search for
terminaland you should be good to go. Windows users will have to complete a few additional steps, see the OS-specific installation instructions down below.
General things#
There are a few computing requirements for the course that are necessary:
You must have administrator access to your computer (i.e., you must be able to install things yourself without requesting IT approval).
You should have at least
20 GBof free disk space on your computer (but we would recommend more, to be safe).If you are using Windows you must be using Windows 10/11; Windows 7 and 8 will not be sufficient for this workshop.
Some parts of this workshop will make use of GitHub, so creating a GitHub account is recommended
If you foresee any of these being a problem please reach out to one of the instructors to see what steps you can take to ensure you are ready for the course start.
Some quick general notes on instructions#
If you already have some of these things installed on your computer that should (theoretically) be okay. However, you need to make sure that you can complete the steps described in
checking your installsection below without issue.
OS-specific installation instructions#
Select the tab that corresponds to your operating system and follow the instructions therein.
Bash shell - Windows Subsystem for Linux (WSL)
Windows doesn’t come with a preinstalled bash shell. To remedy this we will rely on WSL (Windows subystems for Linux), which will provide a Unix command-line based on the latest Ubuntu distribution.
Search for
Windows Powershellin your applications; right click and selectRun as administrator. SelectYeson the prompt that appears asking if you want to allow the app to make changes to your device.Type the following into the Powershell and then press
Enter:wsl --install
Press
Enteragain when prompted to reboot your computer.You’ll find a new application named “Ubuntu”, this is your new command line tool. Right-click and run this app as administrator.
the first launch of the new Linux distribution may take some time as files need to be decompressed and stored
Upon opening the apllication you will be prompted to set up your Linux username and password
to make use of the command line you’ll have to bascially create an deafult user account, which gives you the ability to run sudo (Super User Do) administrative commands
the account name should be simple and contain no extra characters or spaces, e.g. your initials or first name will usually do
`Note: When entering your password nothing will appear on the screen (blind typing), but you’re input will still be registered. Simply type a password and hit enter.
Make sure that your packages are up-to-date by entering the following and hitting enter:
sudo apt update && sudo apt upgradehere you’ll be asked for the password you set in the previous step
From this point on whenever the instructions specify to “open a terminal” please assume you are supposed to open the Ubuntu application.
Important! This will create a virtual Ubuntu application on your system. The terminal will alwyays start in your Ubuntu home directory, to access your Windows file system you’ll have to use a path that should look something like this /mnt/c/Users/yourusername, where yourusername is your windows user name. If you’re unsure how to navigate through your Ubuntu file system via the terminal, check back with our chapter on [prerequisites/bash](link here).
VSCode
Go to https://code.visualstudio.com/ and click the download button, then run the
.exefile.Leave all the defaults during the installation with the following exception:
Please make sure the box labelled “Register Code as an editor for supported file types” is selected
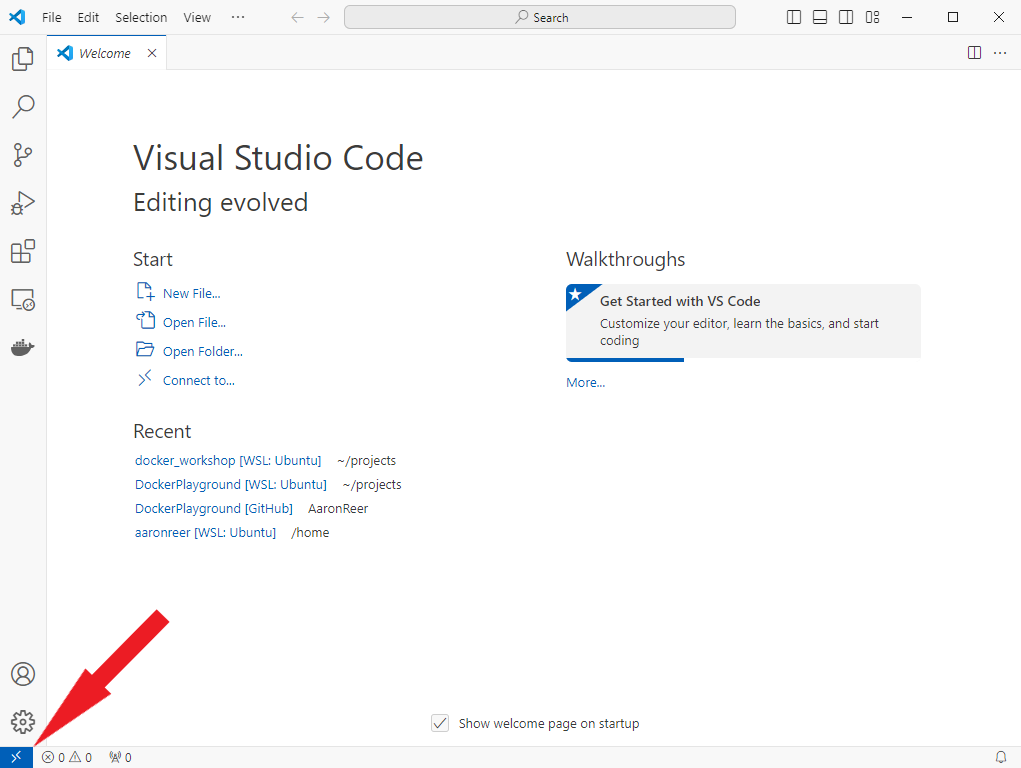
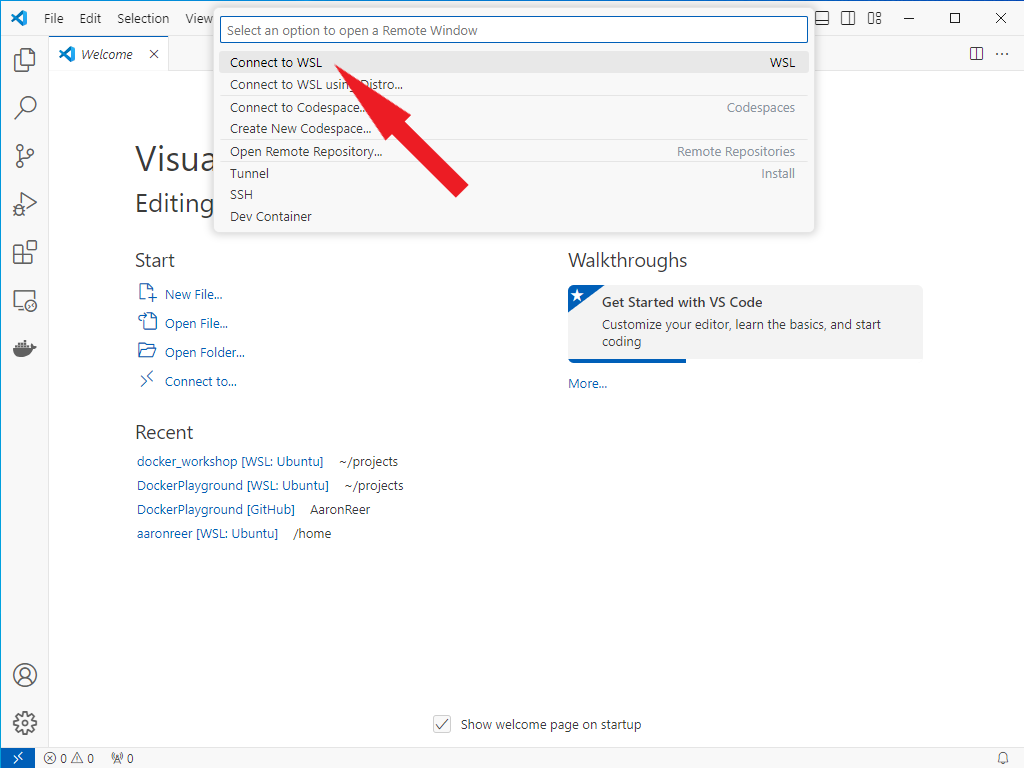
When working with Linux under Windows using WSL you will have two different filesystems/drives since WSL will create a distinct filestystem for every Linux distribution you have installed. VSCode automatically detects WSL distributions and you can connect to them via the remote connection button (Blue button at the bottom left corner of your VSCode window). This is what it should look like:
GitHub
Go to join/ and follow the on-screen instructions to create an account. It is a good idea to associate this with your university e-mail (if you have one) as this will entitle you to sign up for the GitHub Student Developer Pack or GitHub for teachers which come with some nice free bonuses.
Git and Git Annex Unfortunately, Windows does not provide a Git installation out of the box. There are a few ways to set up your Windows system to work with version control systems, but efficiency may suffer when trying to force Git to work with a standard Windows installation.
Good news, though! WSL provides you with a Unix environment, which most likely already includes an up-to-date Git installation. To verify whether this is true for your system, open the Ubuntu application (your ‘terminal’ or ‘command-line interface’). Type: git –version and press Enter. The output should display a sensible version number, e.g.
git version 2.39.2
Should you see no output, an error message or a version number starting with a 1., you will have to install or update you Git installation. We will make use of the linux package manager apt for this, Still in the terminal type the following and hit enter,
sudo apt-get install git
After the installation process is completed, you will want to connect your local Git version to the online version-control system GitHub, to make use of the full functionalilty of Git. For this, first create an account on GitHub and type the following in your terminal, replacing the highlighted text with the information you provided on GitHub:
git config --global user.name <Your Name>
git config --global user.email <youremail@domain.com>
Verify that your data is correct by running the same command again, but omitting the email-input:
git config --global user.email
Which will return the email you have registered.
Should you want to change or override this information, simply run the above commands again, providing your corrected email.
Additionally, we will want to make use of Git Annex, a version control and data managment system. Input the following into your terminal:
sudo apt-get install git-annex
For more information and troubleshooting, you can check the following ressources: Getting started with Git (Microsoft) Setting your commit email addres
DataLad
Our friendly all-purpose data managemnt software. Learning Datalad will make your life (professional) much easier, so we highly encourage not only following our workshop,but having a look at the masterpiece that is the Datalad Handbook. They also provide a a OS-specific installation guide, but we will be changing this process up a little not only using the python package manager pip that all of you already have preinstalled with your OS (your Ubuntu app created with WSL in the case of Windows kids), and the provided enviornment managemnt package venv.
But before we copy and paste the following code block into your terminal, let’s look at what it actually does
python -m venv --system-site-packages ~/env/dataladcreates a virtual environment in the directory ~/env/datalad and ensures access to globally installed Python packagessource ~/env/datalad/bin/activateactivates the virtual environment you just created, isolating your terminal session for your Datalad-related work from your baseline environmentpython -m pip install dataladnow installs the datalad package into your isolated virtual environment using the Python package manager, pip.same thing, just for the datalad-container extension, which allows you to manage and run automated pipelines (Docker or singularity container) on your data
  python -m venv --system-site-packages ~/env/datalad && source ~/env/datalad/bin/activate;
  python -m pip install datalad
  python -m pip install datalad-container
Note: From now on, whenever you want to work with Datalad, activate the virtual environment in your terminal with:
source ~/env/datalad/bin/activate
GIN.g-node interface
G-Node, or the “German Neuroinformatics Node” interface, provides a GDPR-compliant service for data storage and sharing. It is built on Git and git-annex, allowing easy integration into version-controlled, automated workflows. To begin, you’ll need to set up an account on the public GIN website.
If we want to upload files from our local system to GIN and make full use of our setup using Datalad and Git to manage our files, we’ll need to connect these services. This can be done by generating and sharing SSH keys between the services. SSH (Secure Shell Protocol) keys are authentication protocols that allow secure login from a local system to remote servers and services. For example, if you’re working on a local server system, you’ve likely already used SSH.
Admittedly, this is a more complex process that we will not have time to cover in detail during the workshop. However, you can refer to the following resources for guidance on generating an SSH key using the terminal and adding it to your GitHub and GIN repositories:
Docker
Unfortunately, getting Docker to work on Windows is a tad more complicated.
Download the installer from this website.
Double-click Docker Desktop Installer.exe to run the installer. By default, Docker Desktop is installed at C:\Program Files\Docker\Docker.
When prompted, ensure that “Use WSL 2” instead of Hyper-V option on the Configuration page is selected.
If your system only supports one of the two options, you will not be able to select which backend to use.
Follow the instructions on the installation wizard to authorize the installer and proceed with the install.
When the installation is successful, select Close to complete the installation process.
Open Docker Dektop, agree to the the terms of service and login using your Dockerhub user credentials. Now, the Docker engine should start (if starting of the Docker engine takes more than 5 minutes, restart your computer.
If your admin account is different to your user account, you must add the user to the docker-users group:
Run
Computer Managementasadministrator.Navigate to Local Users and Groups > Groups > docker-users.
Right-click to add the user to the group. 4)Sign out and sign back in for the changes to take effect.
Bash shell
You already have it!
Depending on which version of Linux you’re running you may need to type bash inside the terminal to access it (and hit enter).
To check whether this is necessary, follow these steps:
Open a terminal and type echo $SHELL.
If it reads /bin/bash then you are all set, this should be the standard.
If not go through these following steps:
To check which shell you’re using open a terminal and type
echo $SHELL.
If it read `/bin/zsh we will need to make the following adjustments
Type
cat /etc/shellsand hit enterunder the list of accaeptable shells you should find
/bin/bash, note down this path (in most cases it should just read /bin/bash)
Type
chsh -s /bin/bashand hit enter (Note.chshstands simply for “change shell”, this process is harmless and reversible, no worries. For more info see the official documentation))Close and reopen your terminal
Verify that you’re now using the bash shell via
echo $SHELL
VSCode
Go to https://code.visualstudio.com/ and click the download button for either the .deb (Ubuntu, Debian) or the .rpm (Fedora, CentOS) file.
Double-click the downloaded file to install VSCode.
GitHub
Go to join/ and follow the on-screen instructions to create an account. It is a good idea to associate this with your university e-mail (if you have one) as this will entitle you to sign up for the GitHub Student Developer Pack or GitHub for teachers which come with some nice free bonuses.
Git and Git-Annex Should also be pre-installed! To verify run the followin command in your terminal
git --version
Should you see no output, an error message or a version number starting with a 1., you will have to install or update you Git installation. We will make use of the linux package manager apt for this, Still in the terminal type the following and hit enter,
sudo apt-get install git
After the installation process is completed, you will want to connect your local Git version to the online version-control system GitHub, to make use of the full functionalilty of Git. For this, first create an account on GitHub and type the following in your terminal, replacing the highlighted text with the information you provided on GitHub:
git config --global user.name <Your Name>
git config --global user.email <youremail@domain.com>
Verify that your data is correct by running the same command again, but omitting the email-input:
git config --global user.email
Should you want to change or override this information, simply run the above commands again, providing your corrected email.
Additionally, we will want to make use of Git Annex, a version control and data managment system. Input the following into your terminal:
sudo apt-get install git-annex
DataLad
Our friendly all-purpose data managemnt software. Learning Datalad will make your life (professional) much easier, so we highly encourage not only following our workshop,but having a look at the masterpiece that is the Datalad Handbook. They also provide a a OS-specific installation guide, but we will be changing this process up a little not only using the python package manager pip that all of you already have preinstalled with your OS (WSL in the case of Windows kids), and the provided enviornment managemnt package venv.
But before we copy and paste the following code block into your terminal, let’s look at what it actually does
python -m venv --system-site-packages ~/env/dataladcreates a virtual environment in the directory ~/env/datalad and ensures access to globally installed Python packagessource ~/env/datalad/bin/activateactivates the virtual environment you just created, isolating your terminal session for your Datalad-related work from your baseline environmentpython -m pip install dataladnow installs the datalad package into your isolated virtual environment using the Python package manager, pip.same thing, just for the datalad-container extension, which allows you to manage and run automated pipelines (Docker or singularity container) on your data
  python -m venv --system-site-packages ~/env/datalad && source ~/env/datalad/bin/activate;
  python -m pip install datalad
  python -m pip install datalad-container
Note: From now on, whenever you want to work with Datalad, activate the virtual environment in your terminal with:
source ~/env/datalad/bin/activate
GIN.g-node interface
G-Node, or the “German Neuroinformatics Node” interface, provides a GDPR-compliant service for data storage and sharing. It is built on Git and git-annex, allowing easy integration into version-controlled, automated workflows. To begin, you’ll need to set up an account on the public GIN website.
If we want to upload files from our local system to GIN and make full use of our setup using Datalad and Git to manage our files, we’ll need to connect these services. This can be done by generating and sharing SSH keys between the services. SSH (Secure Shell Protocol) keys are authentication protocols that allow secure login from a local system to remote servers and services. For example, if you’re working on a local server system, you’ve likely already used SSH.
Admittedly, this is a more complex process that we will not have time to cover in detail during the workshop. However, you can refer to the following resources for guidance on generating an SSH key using the terminal and adding it to your GitHub and GIN repositories:
Docker
Installing Docker Desktop is the recommended approach for all systems. You’ll need administraror (sudo) rights to follow this process.
Install Docker Desktop by following the official installation guide for your specific distro.
Set up Docker’s package repository. See
step oneof Install using the apt repository.Download latest package
Open a terminal and install the package with apt following the instructions on the website
To Launch Docker Desktop run: `systemctl –user start docker-desktop``
alternatively to enable Docker Desktop to start at sign-in run:
systemctl --user enable docker-desktop
Close and Re-open a new terminal and type
docker run hello-world. A brief introductory message should be printed to the screen.
Bash shell
You already have it!
Newer versions of Mac OS will rely on a differnt standard, i.e. zsh, so we might need a few extra steps to setup your system.
To check which shell you’re using open a terminal and type
echo $SHELL.If it reads
/bin/bashthen you are all set!If it read `/bin/zsh we will need to make the following adjustments
Type
cat /etc/shellsand hit enterunder the list of accaeptable shells you should find
/bin/bash, note down this path (in most cases it should just read /bin/bash)
Type
chsh -s /bin/bashand hit enter (Note.chshstands simply for “change shell”, this process is harmless and reversible, no worries. For more info see the official documentation))Close and reopen your terminal
Verify that you’re now using the bash shell via
echo $SHELL
VSCode
Go to https://code.visualstudio.com/ and click the download button.
Unzip the downloaded file (e.g.,
VSCode-darwin-stable.zip) and moving the resultingVisual Studio Codefile to your Applications directory.
GitHub
Go to join/ and follow the on-screen instructions to create an account. It is a good idea to associate this with your university e-mail (if you have one) as this will entitle you to sign up for the GitHub Student Developer Pack or GitHub for teachers which come with some nice free bonuses.
Git and Git-Annex Unlike other Unix-systems MacOs sadly doesn’t usually provide a Git installation straight out of the box. So we’ll first have to install a package manager that allows us the installation of programms via the terminal.
Head to the following site and simply cope-paste the highlighted bash code: Homebrew It should look something like, this:
/bin/bash -c "$(curl -fsSL https://raw.githubusercontent.com/Homebrew/install/HEAD/install.sh)
The output of the script will explain exactly what it does and ask for your confirmation at every relevant step.
Once this is done, still in your terminal, input the following command:
brew install git
Additionally, we will want to make use of Git Annex, a version control and data managment system. Input the following into your terminal:
brew install git-annex
After the installation process is completed, you will want to connect your local Git version to the online version-control system GitHub, to make use of the full functionalilty of Git. For this, first create an account on GitHub and type the following in your terminal, replacing the highlighted text with the information you provided on GitHub:
git config --global user.name <Your Name>
git config --global user.email <youremail@domain.com>
Verify that your data is correct by running the same command again, but omitting the email-input:
git config --global user.email
Should you want to change or override this information, simply run the above commands again, providing your corrected email.
DataLad
Our friendly all-purpose data managemnt software. Learning Datalad will make your life (professional) much easier, so we highly encourage not only following our workshop,but having a look at the masterpiece that is the Datalad Handbook. They also provide a a OS-specific installation guide, but we will be changing this process up a little not only using the python package manager pip that all of you already have preinstalled with your OS (WSL in the case of Windows kids), and the provided enviornment managemnt package venv.
But before we copy and paste the following code block into your terminal, let’s look at what it actually does
python -m venv --system-site-packages ~/env/dataladcreates a virtual environment in the directory ~/env/datalad and ensures access to globally installed Python packagessource ~/env/datalad/bin/activateactivates the virtual environment you just created, isolating your terminal session for your Datalad-related work from your baseline environmentpython -m pip install dataladnow installs the datalad package into your isolated virtual environment using the Python package manager, pip.same thing, just for the datalad-container extension, which allows you to manage and run automated pipelines (Docker or singularity container) on your data
  python -m venv --system-site-packages ~/env/datalad && source ~/env/datalad/bin/activate;
  python -m pip install datalad
  python -m pip install datalad-container
Note: From now on, whenever you want to work with Datalad, activate the virtual environment in your terminal with:
source ~/env/datalad/bin/activate
GIN.g-node interface
G-Node, or the “German Neuroinformatics Node” interface, provides a GDPR-compliant service for data storage and sharing. It is built on Git and git-annex, allowing easy integration into version-controlled, automated workflows. To begin, you’ll need to set up an account on the public GIN website.
If we want to upload files from our local system to GIN and make full use of our setup using Datalad and Git to manage our files, we’ll need to connect these services. This can be done by generating and sharing SSH keys between the services. SSH (Secure Shell Protocol) keys are authentication protocols that allow secure login from a local system to remote servers and services. For example, if you’re working on a local server system, you’ve likely already used SSH.
Admittedly, this is a more complex process that we will not have time to cover in detail during the workshop. However, you can refer to the following resources for guidance on generating an SSH key using the terminal and adding it to your GitHub and GIN repositories:
Docker
Go to https://hub.docker.com/editions/community/docker-ce-desktop-mac/ and press “Get Docker”.
Open the “Docker.dmg” file that is downloaded and drag and drop the icon to the Applications folder
Open the Docker application and enter your password. An icon will appear in the status bar in the top-left of the screen. Wait until it reads “Docker Desktop is now up and running!”
Open a new terminal and type
docker run hello-world. A brief introductory message should be printed to the screen.
(The above step-by-step Docker instructions are distilled from here. If you have questions during the installation procedure please check that link for potential answers!)
Note: If the instructions aren’t working and you have spent more than 15-20 minutes troubleshooting on your own, reach out to the instructors or create a pull request for the assoicated GitHub Repo.
Office hours: upon request
E-mail:
ernst@psych.uni-frankfurt.depreferred mode of contact: via e-mail
How do we address one another?
He/Him. When contacting me, please refrain from using honoraries and formal language, “Michael” or “you” is fine as long as the content is respectful, fair, and constructive (I aim for the same when I reply). However, please let me know if you have a preferred way of interacting with other folks, including how you would like to be addressed, your pronouns, and the level of formality.
Checking your install#
open a new terminal (i.e. start the Ubuntu application if you are on windows)
Input
git --versiona git version should be displayed
Start your Datalad environment by inputting:
source ~/env/datalad/bin/activatethe name of your environemnt should appear before your username in your terminal, e.g.
(base) Michaels-MacBook-Pro:dm_workshop_setup me$ source ~/env/datalad/bin/activate
(datalad) (base) Michaels-MacBook-Pro:dm_workshop_setup me$
Input
datalad --versiona datalad version should be displayed
Enter the matrix#
Once you have reached this point, you should be ready the enter the matrix and follow the workshop in your preferred way. Congrats, fantastic work!

https://media1.tenor.com/images/e5c21d98f56c4af119b4e14b6a9df893/tenor.gif?itemid=4011236